If you’ve recently set up a new monitor and noticed a tiny spot that’s either constantly lit or permanently dark, that’s most likely a dead pixel. It may not stand out at first, but once you see it, it becomes hard to ignore—especially on high-end displays or laptops where every pixel matters.
In this case, UDPixel is a handy tool worth trying.
1️⃣ What is UDPixel?
UDPixel is a free and lightweight software designed to both test and attempt to repair dead or stuck pixels on your monitor. It comes in a portable .zip version, so you can run it without installation.
2️⃣ Key Features of UDPixel
- Pixel Testing: Displays solid colors (red, green, blue, black, white, yellow) in full screen to help identify dead or stuck pixels.
- Pixel Revival: Uses flashing windows to stimulate stuck pixels and try to reactivate them.
- Multi-Window Flashing: Supports flashing multiple areas at once for multiple pixel issues.
- User-Friendly Interface: Clean and easy to use—even for beginners.
3️⃣ Download & Install UDPixel
- Click the link below to visit the official UDPixel download page:
- The
.zipversion is portable and requires no installation. Just extract and run the executable. - After unzipping, locate the file UDPixel.exe and double-click to launch the program.
4️⃣ How to Use UDPixel
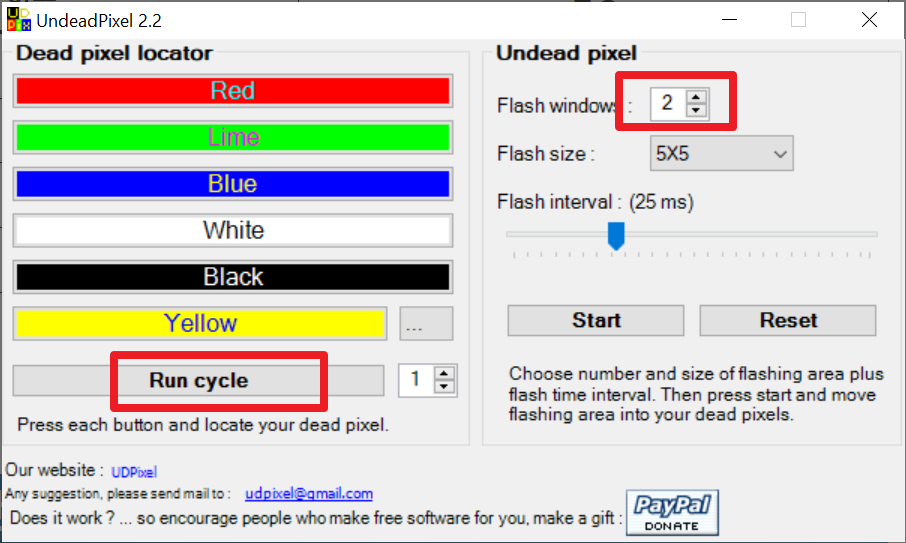
➊ Step 1: Detect Dead Pixels with Color Cycle
- Launch the program and find the
Color Cyclesection.
Set display time (in seconds) for each color.
Example:Red: 3,Green: 3,Blue: 3,White: 3,Black: 3,Yellow: 3 - Click the
Run Cyclebutton.
The screen will cycle through the selected colors in full-screen mode. - If you see a spot that stays dark or stuck in color during the cycle, it’s likely a dead or stuck pixel.
✅ Tip: A white dot on a black screen or a black dot on a red screen usually indicates pixel issues.
➋ Step 2: Set Flash Window Count
Count how many dead pixels you found. In the Flash Windows field, enter that number (e.g., 2 if you found two).
This will create that many flashing boxes on your screen.
➌ Step 3: Move Flash Windows
Click and drag each flashing window to the exact location of the stuck pixel on your screen.
➍ Step 4: Adjust Flash Interval
The Interval setting controls how fast the flash blinks.
We recommend 10–30ms. Too fast (like 1–5ms) may cause screen stress.
➎ Step 5: Start Pixel Stimulation
Once everything is set, click the Start button.
Let it run for 2–3 hours. If the pixel is only temporarily stuck, it may begin working again.
⚠️ Warning: Don’t leave it running for more than 4 hours. Prolonged flashing can cause screen burn-in.
5️⃣ How Does It Work?
UDPixel works by rapidly flashing RGB colors over stuck pixels to try and “wake” them.
It’s a safe, non-physical method and is most effective for stuck (not dead) pixels.
6️⃣ Tips for Long-Term Screen Care
- Use sleep mode or turn off the screen after extended use.
- Avoid leaving static images displayed for too long.
- Use screen savers to keep pixels active.
- Don’t keep brightness and contrast at maximum all the time.
7️⃣ The Free Fix That Could Save Your Screen
If you’re dealing with dead or stuck pixels, UDPixel is a great first step before considering screen replacement.
It won’t fix every issue, but for stuck pixels, it’s a free and simple tool that just might save your screen (and your wallet).