Outlook Email Recall and Linking Accounts are two essential features that can significantly enhance your email management experience. Whether you’re correcting a mistake in a sent email or consolidating multiple accounts for ease of access, mastering these tools will save time and increase efficiency. Let’s dive into how to use these features effectively.
What is Outlook Email Recall?
Outlook Email Recall allows you to retract an email sent in error, preventing the recipient from seeing it. While incredibly useful, it works only under certain conditions.

How to Recall an Email in Outlook
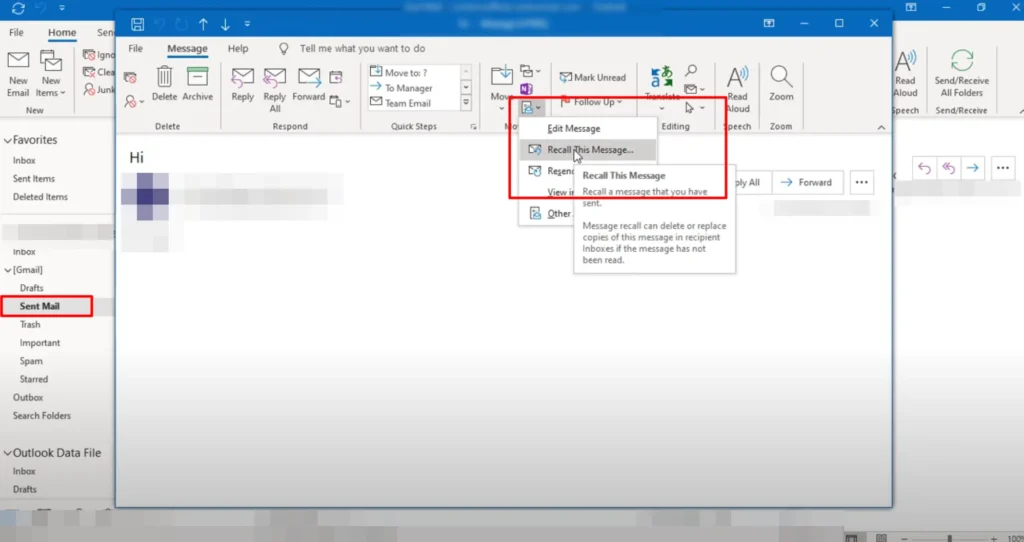
- Open the Sent Email:
Navigate to the “Sent Items” folder and double-click the email you want to recall. - Access Recall Options:
Go to the “Message” tab, then click “Actions” and select “Recall This Message.”

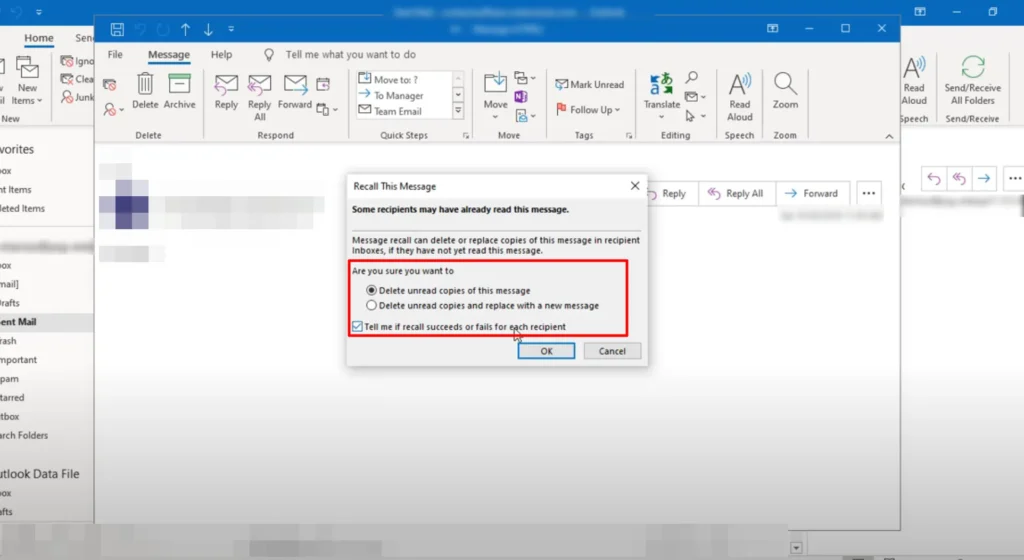
- Choose Your Action:
- Delete unread copies of this message.
- Replace unread copies with a new message.

- Confirm Recall:
Once selected, Outlook will attempt to recall the email, but success depends on whether the recipient has read it or uses compatible software.
Limitations of Email Recall
- Recipient’s Email Client: Recall works only if the recipient also uses Outlook and is within the same organization.
- Read Emails: If the recipient has already opened the email, recall won’t work.
- External Recipients: Emails sent outside your organization cannot be recalled.
Pro Tip: Double-check recipients and attachments before hitting “Send” to minimize recall dependency.
How to Link Accounts in Outlook
Linking multiple email accounts in Outlook enables centralized management, eliminating the need to switch between apps or browsers. This feature is especially useful for those managing both personal and professional email addresses.
Steps to Link an Account in Outlook
- Access Account Settings:
Open Outlook, go to “File” > “Account Settings” > “Account Settings.” - Add a New Account:
Click “New” and enter the email address you want to add. Outlook will attempt to configure the account automatically. - Manual Setup (If Needed):
If automatic setup fails, select “Manual Setup” and provide IMAP or POP settings from your email provider. - Finish Setup:
After successful setup, the new account will appear in your Outlook interface, allowing seamless access to its inbox and folders.
IMAP vs. POP: Which One to Choose?
- IMAP: Ideal for accessing the same emails across multiple devices. Emails are stored on the server, ensuring synchronization.
- POP: Best for single-device usage, as emails are downloaded locally and often deleted from the server.
Pro Tip: Use IMAP for modern workflows requiring cross-device access.
Best Practices for Managing Linked Accounts
- Folder Organization: Keep separate folders for each account or use rules to categorize emails automatically.
- Unified Inbox: Consider enabling a unified inbox view to monitor all accounts at once.
- Set Priorities: Assign color codes or flags to differentiate emails from various accounts.
Why Master These Features?
Optimizing your email workflow with Outlook Email Recall and Linking Accounts offers several benefits:
- Increased Productivity: Save time by managing emails efficiently.
- Error Mitigation: Correct mistakes quickly with recall options.
- Streamlined Management: Access all your email accounts from a single interface.
By mastering these tools, you’ll unlock the full potential of Outlook, making your email communication smoother and more professional.